
The viral Hydro-Bun took over TikTok. The Met Gala proved messy updos beat slicked perfection. These summer bun hairstyles 2026 split the difference—sculptured shine meets soft, face-framing texture. Jump to the Cloud Bun, the Invisible-Tie Wrap, or the Spiky Micro-Bun. All DIY. All under 15 minutes.
The Midnight Cherry Messy Bun
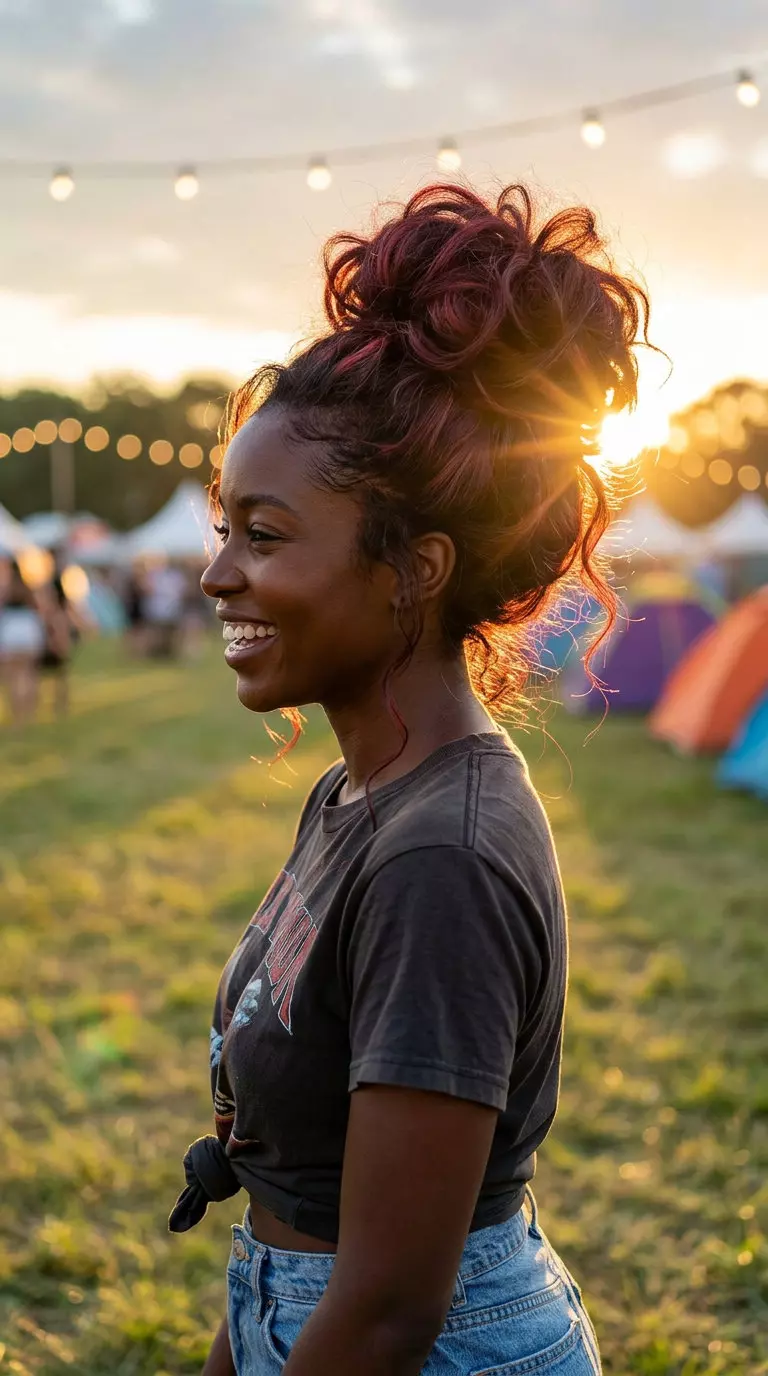
Thick, wavy, or curly hair is your superpower here. A voluminous messy bun long hair style demands texture that grips without silicone sprays or heavy products. Start with day-old or dry-shampooed hair—fresh waves from the shower collapse flat. Gather hair high and loose, leaving face-framing pieces uneven. The disorder is the point. Twist once, wrap around the base, pin where it naturally wants to stay, then deliberately pull sections free so the whole thing looks artfully broken. You’re aiming for the Dua Lipa ‘Radical Optimism’ vibe: bold, intentional, slightly undone.
The red-violet color shift demands maintenance every 4 to 6 weeks, but the bun itself lasts all day and into the next morning. This works at festivals, rooftop parties, outdoor dinners—any scene where your hair can be raw and energetic without apology. If humidity is your enemy, skip this if your hair is fine or prone to frizz; the texture won’t hold volume in moisture.
The Honey Twisted Bun
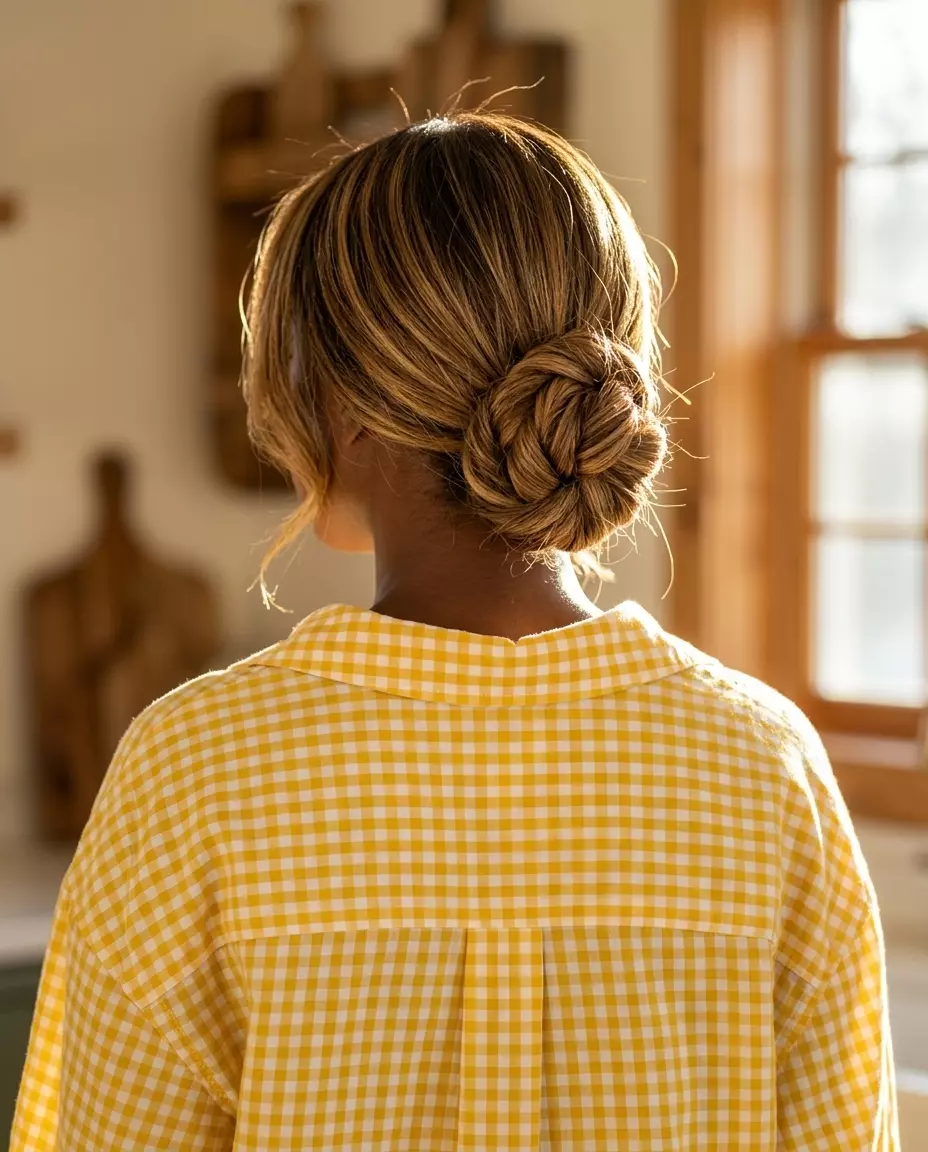
The twisted bun tutorial medium hair works because twisting locks sections into a tight spiral—no loose ends slip out. Start with damp hair for grip, blow-dry while you twist sections toward the crown, then let it cool. Sabrina Carpenter’s Buttercream Blonde and Matilda Djerf’s Scandi aesthetic both rely on this method because the honey highlights catch light at each turn of the spiral. Two hands, one motion. Wrap the twisted section around itself into a low or mid-height bun, pin, done.
Medium hair needs a minimum of shoulder length, ideally longer, so the twist has something to coil around and stay compact. The casual dishevelment works here because slight wispy strands read as intentional, not sloppy. Highlight refresh every 8 to 10 weeks keeps the gold warm and dimensional, which is where most of the magic lives. This style survives farmhouse kitchens, garden afternoons, and sunny lunch dates without looking like you tried too hard.
The Mushroom Bronde French Twist
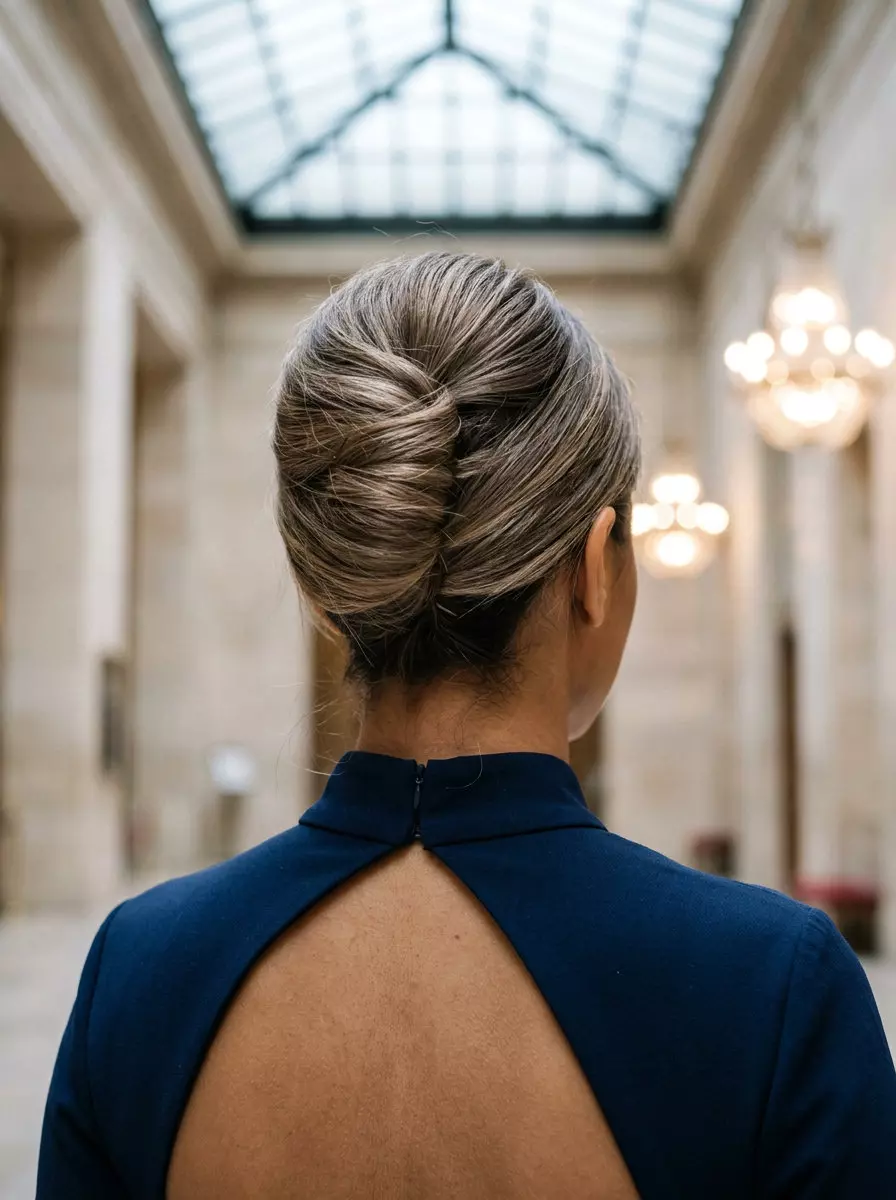
Straight or wavy hair. Longer length. A sleek french twist tutorial requires hair that can be smoothed against the scalp without frizz or bumps showing. Gather hair at the nape, twist the entire length upward along the center of your head, tuck the ends under and pin from the inside. No loose pieces, no disorder—this is where polished wins. Hailey Bieber and Sofia Richie Grainge both favor this because it photographs as refined in direct light and reads as high-maintenance without the fuss.
The Mushroom Bronde balayage—soft, dimensional, muted—demands gloss every 8 weeks and a refresh every 12 to 16 weeks to keep that lived-in but never-dull appearance. This belongs in cool, even-lit spaces: opera houses, gallery openings, places where your hair stays still and the light is kind. Advanced execution means you need practice pulling it tight without a lumpy base, but once your hands know the motion, it takes 10 minutes. Skip this if your hair won’t hold a smooth twist or if you’re not willing to maintain the color dimension.
The Double Dutch Braid Buns
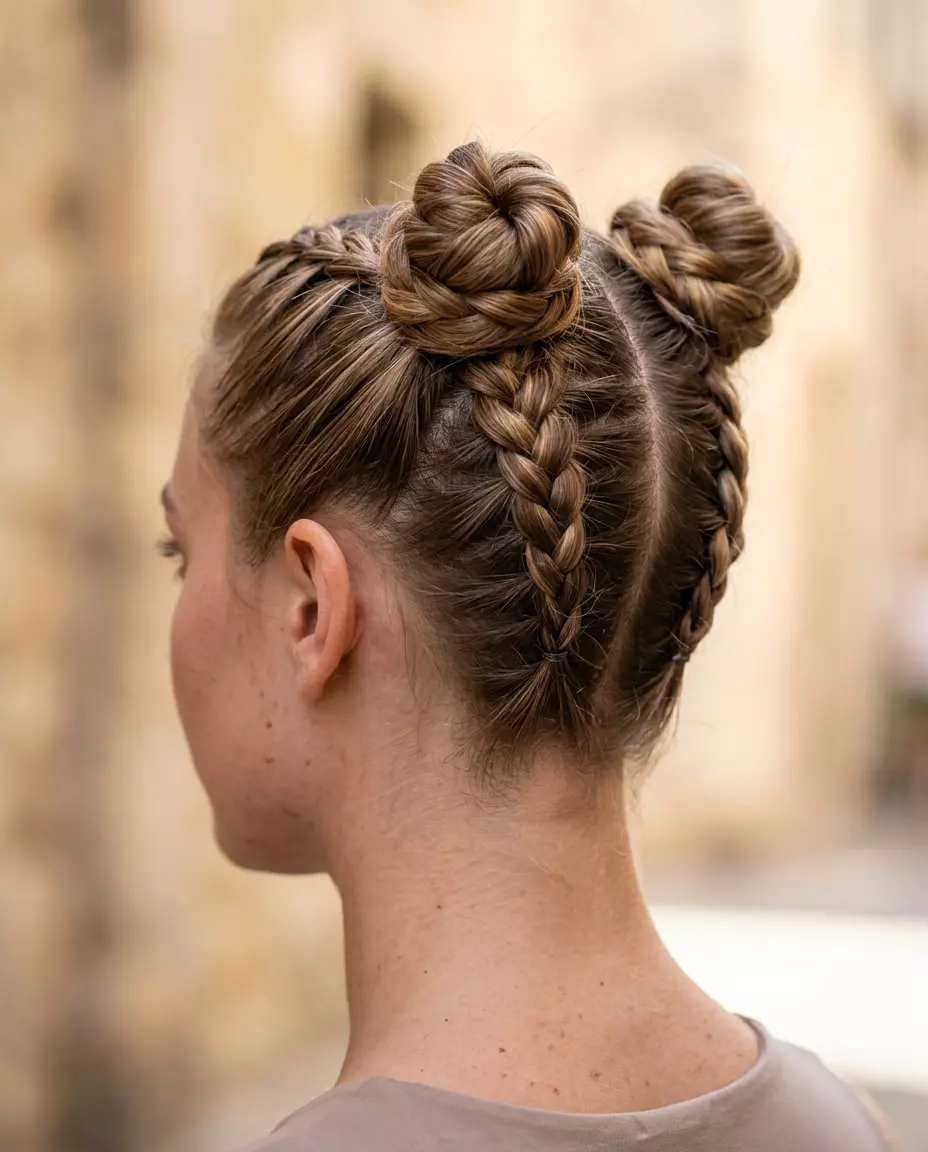
Thick, straight-to-wavy hair that holds braid tension. This is advanced—you braid two sections simultaneously down the sides of your head, then gather each braid and twist it into a bun at either temple or high on the crown. The double dutch braid buns tutorial requires practice because both braids need to sit at the same height and tension, otherwise it reads lopsided. Start with damp hair for grip, Dutch braid (underhand, pulling tight from the scalp), and secure each braid tail with a small elastic, then coil and pin. The movement creates visual interest; the symmetry reads as intentional effort.
This works for all face shapes because the buns draw attention upward, and the braids frame differently depending on where you position them. Split ends show in braids, so trim every 12 to 16 weeks if you’re wearing this regularly. The braid itself lasts 1 to 3 days depending on how tight you pull—looser braids relax faster. Tyla and festival-season energy favor this because it’s athletic, intricate, and holds up in wind and movement. If your hair is fine or prone to breakage, the tension of a tight Dutch braid will stress your scalp—consider loose braids or a different style instead.
The Buttercream Blonde Wavy Chignon
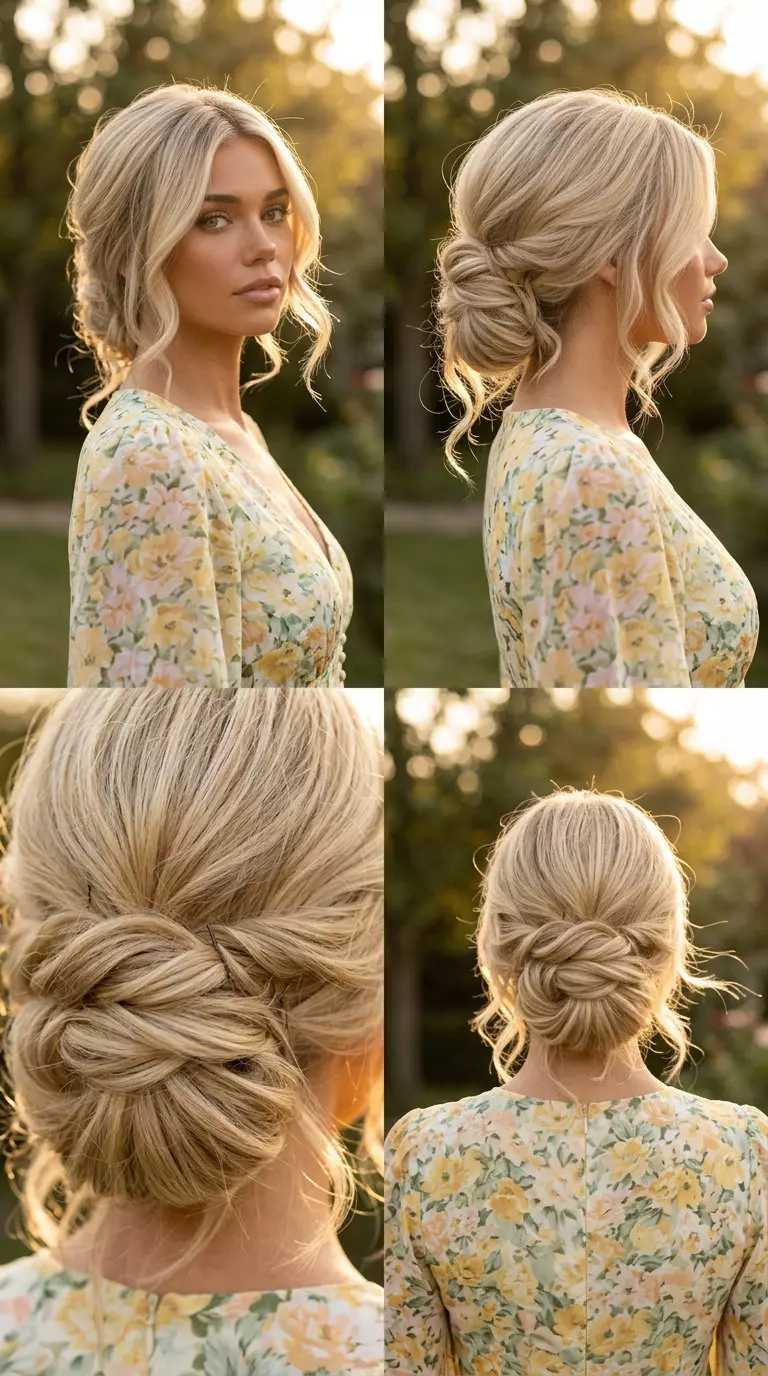
A wavy chignon tutorial lives or dies by your starting texture—and fine to medium density hair with natural wave is the sweet spot. Pull damp hair into a low ponytail at the nape, twist loosely, and wrap the tail around itself. Secure with bobby pins hidden underneath. The waves should be visible, not slicked flat. This is where most people mess up: they tighten too much and lose the softness that makes the style work at all.
Trim every 8–10 weeks to keep layers intact and toner every 6–8 weeks if you’re going blonde like this. The buttercream tone photographs warmly but fades fast in sun. Day-two hair actually works better here—yesterday’s texture holds the twist longer than freshly washed strands do. If you’re seeing flat, lifeless waves, add dry texture spray at the roots before you even start the ponytail.
The Classic Ballerina Bun
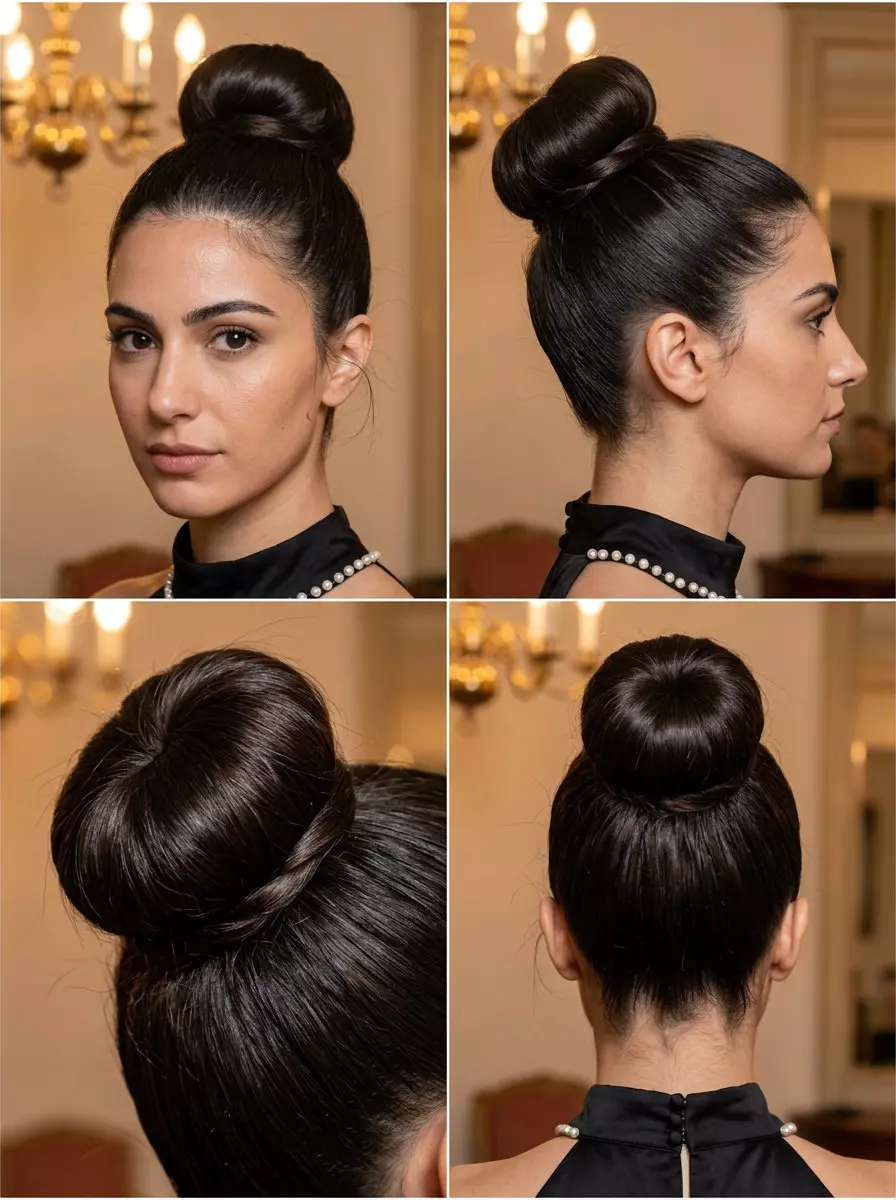
The classic ballerina bun tutorial long hair demands one thing: sleek. Straight to thick hair holds the geometry better, and you need at least shoulder-length length to get volume without looking sparse at the crown. Brush back hard into a high ponytail at the very top of your head, then wrap the tail around and tuck the ends in. Smooth flyaways with a light wax stick or gel. The surface should catch light evenly—any bumps telegraph sloppiness.
Maintenance matters here more than most styles. Trim every 12–16 weeks to keep that blunt line crisp, and a gloss refresh every 8–10 weeks keeps the shine high-impact. This is the one people wear to opera premieres and formal dinners, so precision in execution pays off every single time you wear it.
The Tousled Beach Top Knot
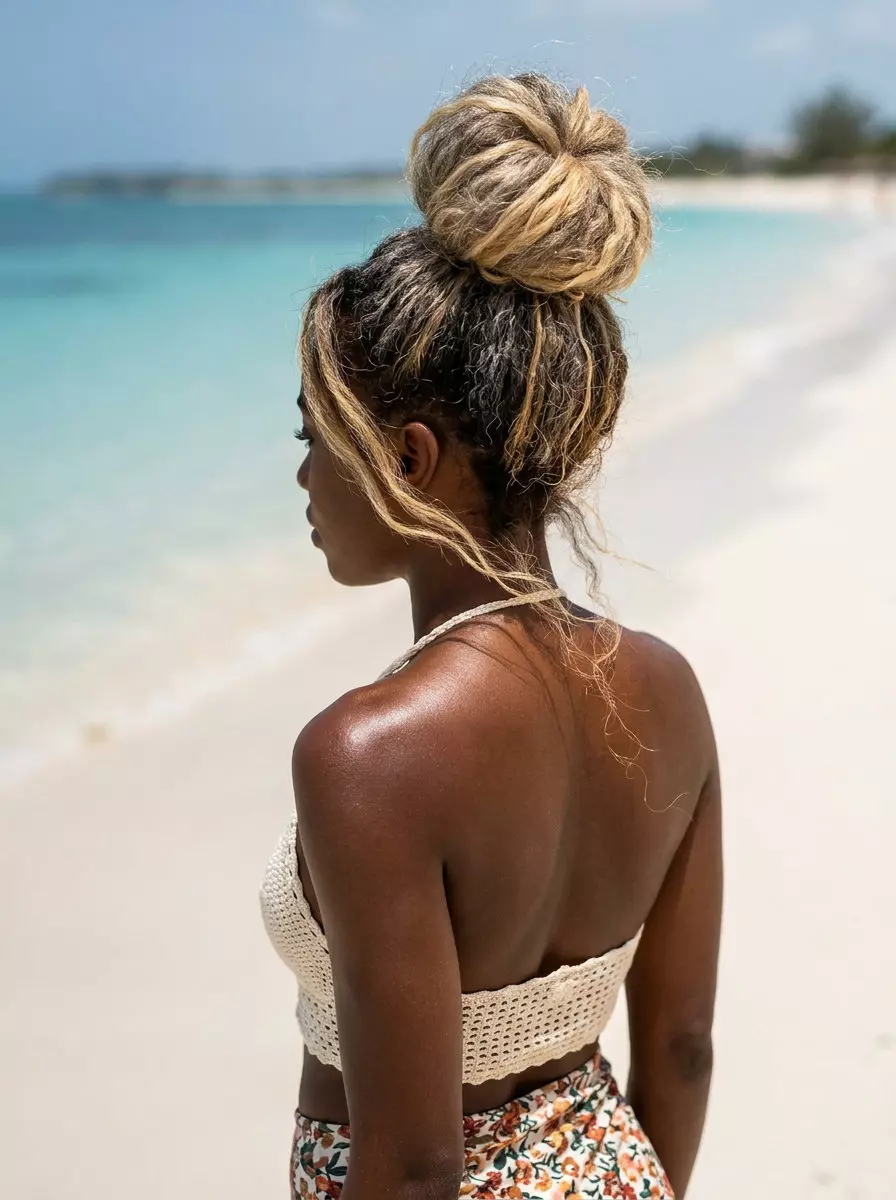
Start with day-two or day-three waves. Gather hair high on the crown—looser than the ballerina version—and secure with a elastic. Don’t smooth it. Tease the base, twist the ends around the ponytail, and pin. Let pieces fall out naturally around your face and neck. Wavy and curly hair thrives here; straight hair will need texture spray or a quick salt mist to hold the shape.
This works for layered cuts and thick density best. The texture hides imperfection, which is the whole point of the beach aesthetic. Trim every 10–12 weeks to maintain movement and refresh toner every 8–10 weeks for color depth. The beachy top knot tutorial long hair leans on movement and ease, not precision, so you have real room to experiment.
The Double Space Bun
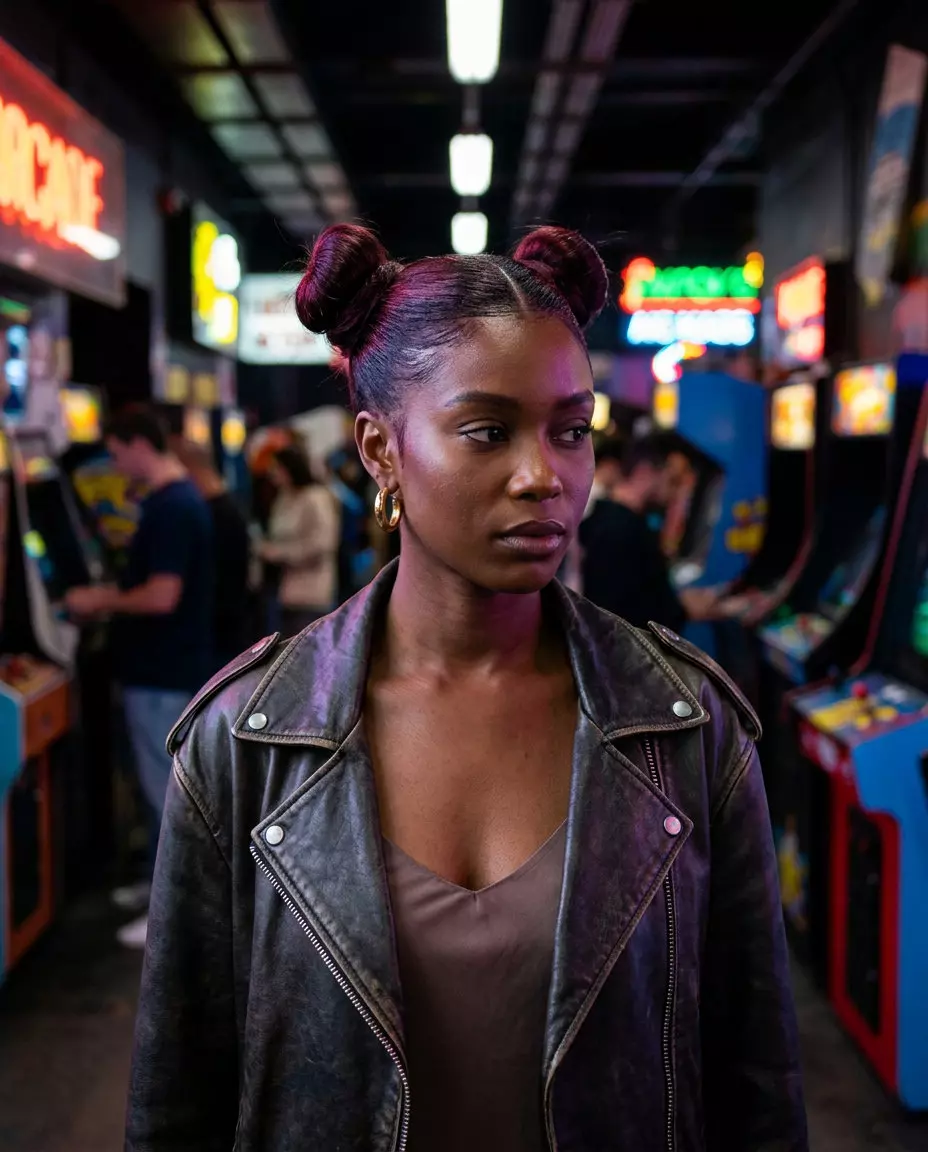
The 90s space bun tutorial demands an undercut—short, faded sides with full length on top—to hit the vibe right. Part the hair down the center from forehead to nape. Create two high ponytails, one on each side of the crown. Twist each tail and wrap it around the base, pinning tight. The undercut should be visible; that’s the whole statement. This cut reads as high-commitment but actually moves fast once you’re in the habit.
Straight fine to medium density hair holds the geometry cleanest. Trim the undercut every 4–6 weeks and refresh color every 4–6 weeks for that sharp contrast. The cut costs real time to maintain, and the style itself takes maybe 10 minutes on repeat attempts. On first try you’ll spend 20 minutes fighting the back sections, but by attempt four it’s automatic.
The Minimalist Double Bun
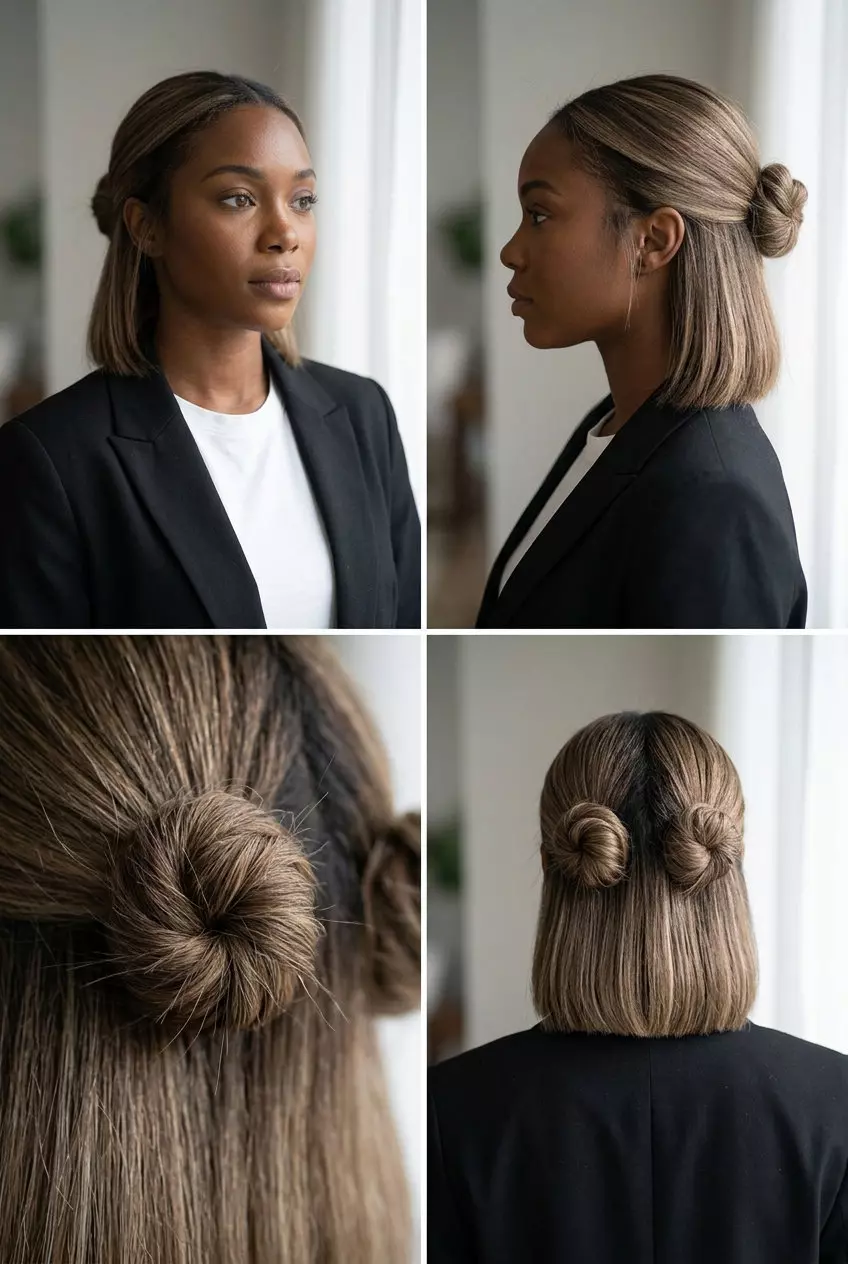
Two small buns positioned low at the nape. Part down the middle, create two ponytails just above the nape, and wrap each around itself, tucking the ends tight. Keep them compact and symmetrical—this is about architectural restraint, not volume. Straight to slightly wavy hair with fine to medium density holds the blunt line well and makes the geometry read instantly. Center the part exactly. Smooth every strand. This is where imprecision shows.
Trim every 8–10 weeks to maintain the blunt line and toner every 10–12 weeks for cool tone depth. The mini bun tutorial medium hair works on shoulder-length length and longer. Skip this if you have naturally curly texture that fights back against the hold—you’ll spend 15 minutes fighting instead of just enjoying the result.
The Buttercream Blonde Messy Bun
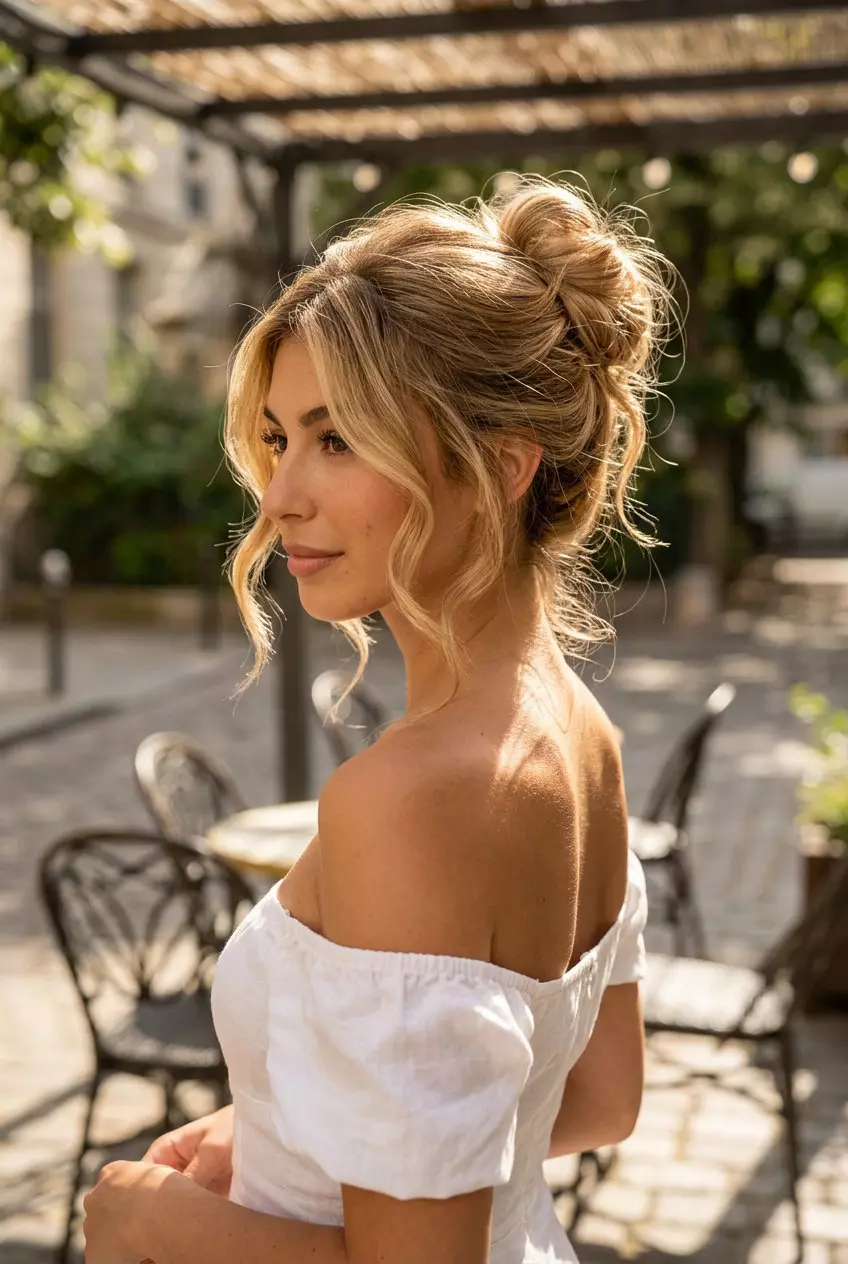
A messy bun with face framing works best on day-two hair—the texture grips better when it’s not freshly washed. Start with a high ponytail, twist it loose, wrap it around the base, and pull out pieces around your face. The layers in this cut (best on wavy to straight, fine to medium density hair) help create volume without weight, so the bun reads as intentionally tousled rather than sloppy. Trim every 8-10 weeks to maintain the choppy texture, and use purple shampoo once weekly if you’re working with buttercream blonde.
The Textured Half-Up Bun
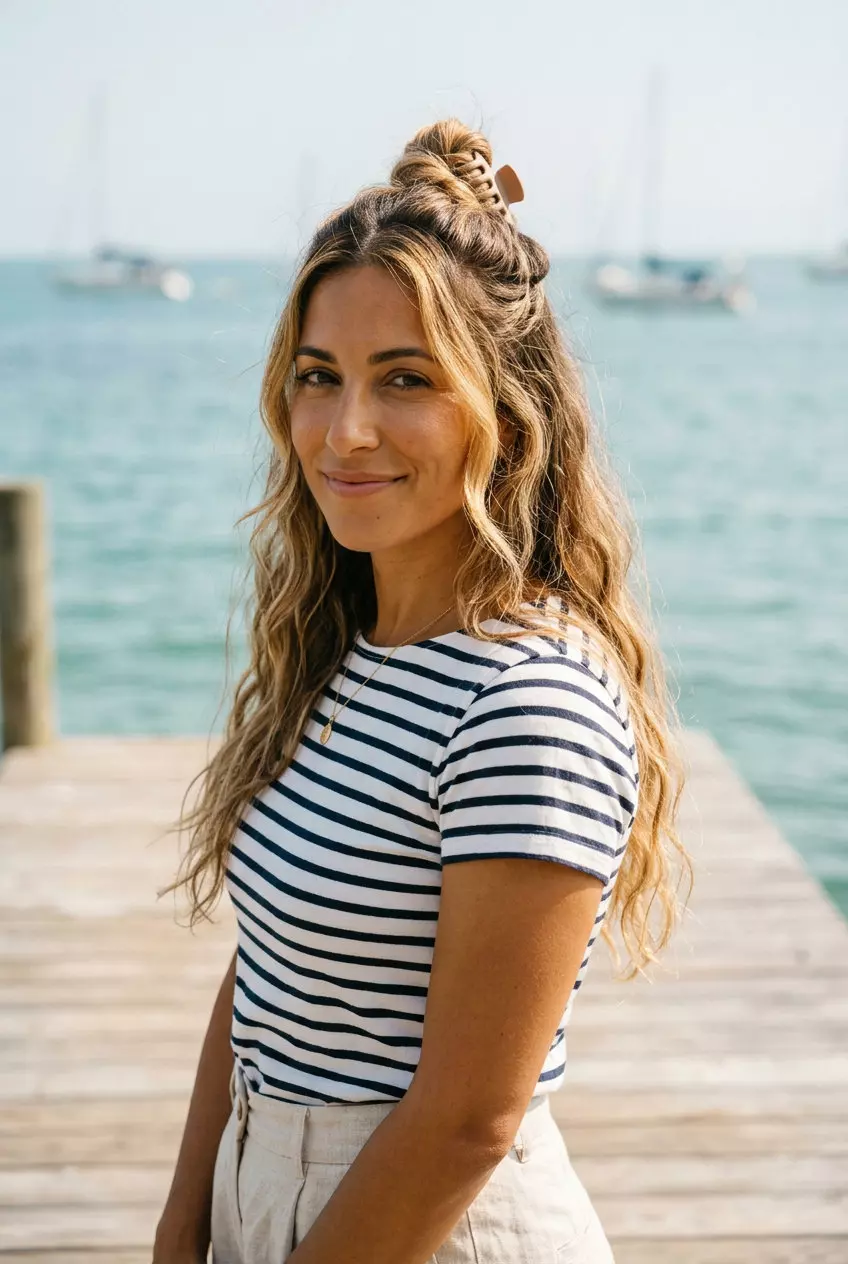
Half-up styles work on round, oval, and heart faces because they balance volume at the crown without overwhelming your frame. Backcomb the crown section before pinning to lock grip, then pull out tendrils to soften the structure. The point-cut layers characteristic of this look catch light and movement, so even a casual half-bun reads as intentional rather than rushed. Trim every 8-10 weeks to maintain the choppy texture, and refresh balayage every 4-5 months to keep the color dimension readable in sunlight. A textured half-up bun tutorial depends on wavy, medium to thick hair—the texture does the work for you.
The Apricot Romantic Bun
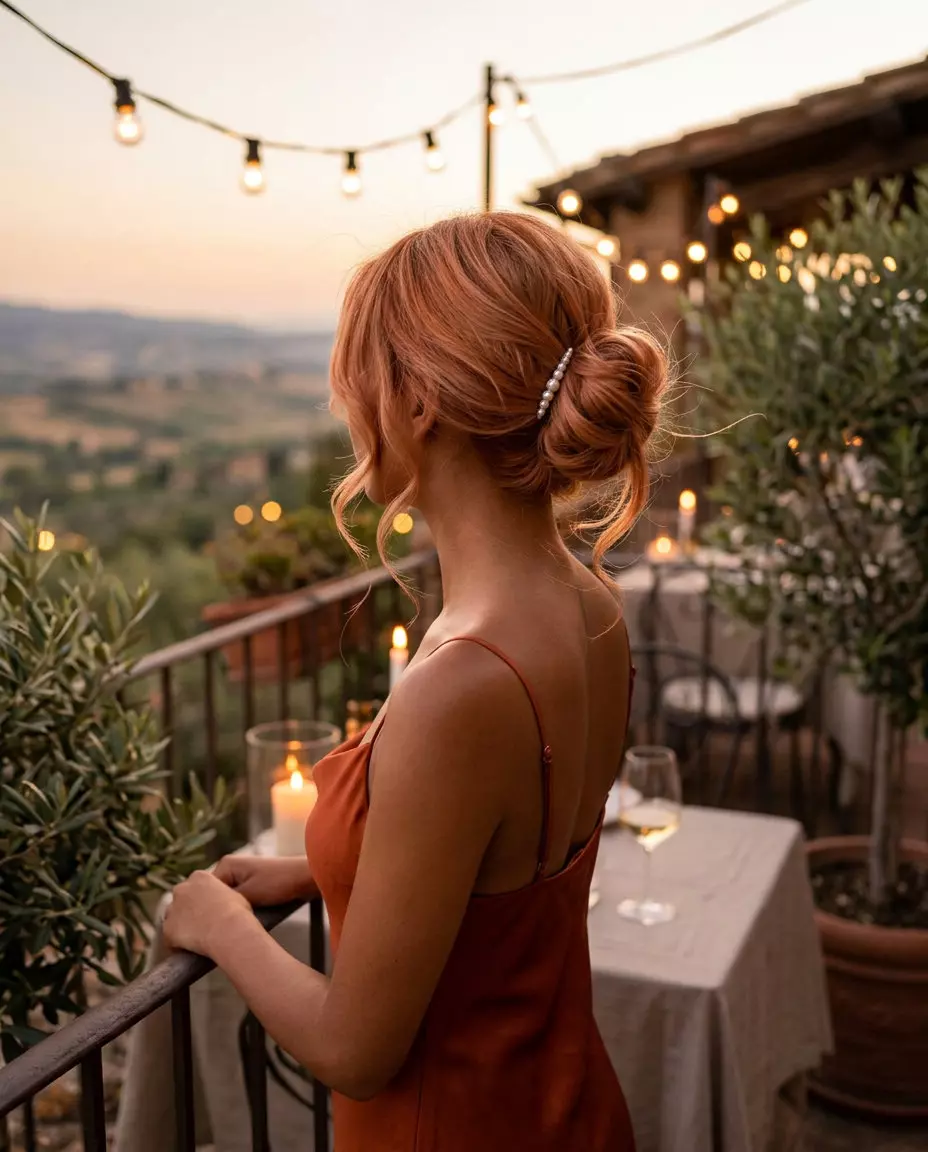
Soft face-framing pieces are non-negotiable here—they’re what transforms a bun from practical to romantic. Apricot hair color ideas work because the shade sits between warm and cool, so it reads differently in morning light versus evening light. The color refresh every 4-5 weeks keeps the tone from fading into a dusty peach, which kills the romantic vibe instantly. Start your bun loose, let tendrils fall around your temples and neck, and don’t aim for symmetry—asymmetrical placement looks intentional and reads as less try-hard than a centered knot.
The Wet-Look Sculpted Bun
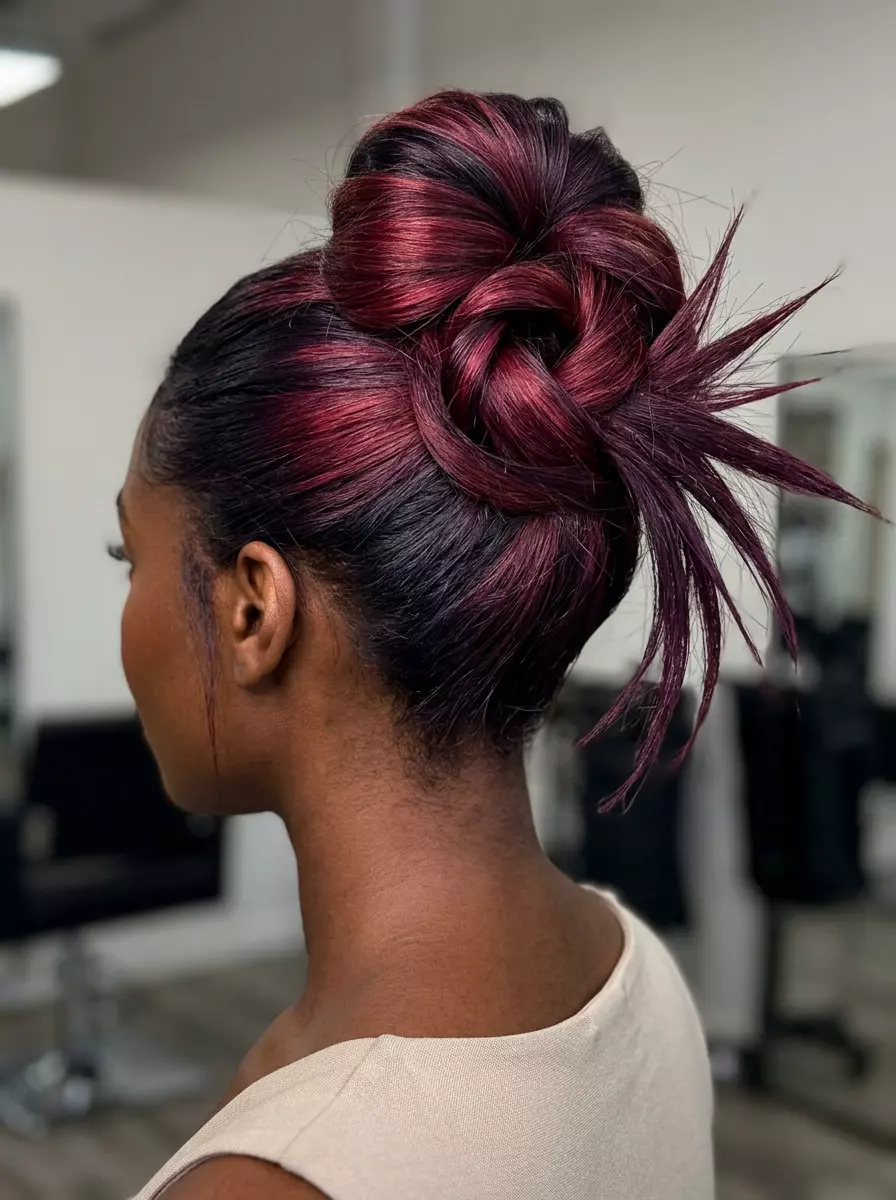
This is not a DIY unless you’re advanced and willing to spend 30-45 minutes on placement alone. A sculpted bun tutorial of this level requires medium to thick, straight hair—razoring on fine hair causes breakage, and on very curly hair the structure collapses within two hours. The wet-look finish demands a sleek gel applied section-by-section, each part pinned until dry. The midnight cherry color melt refresh every 6-8 weeks keeps the gradient sharp, and trims every 8-10 weeks maintain the geometric precision of the bun itself. This is gallery-opening hair, not Tuesday-morning hair.
The Platinum Sculptured Bun
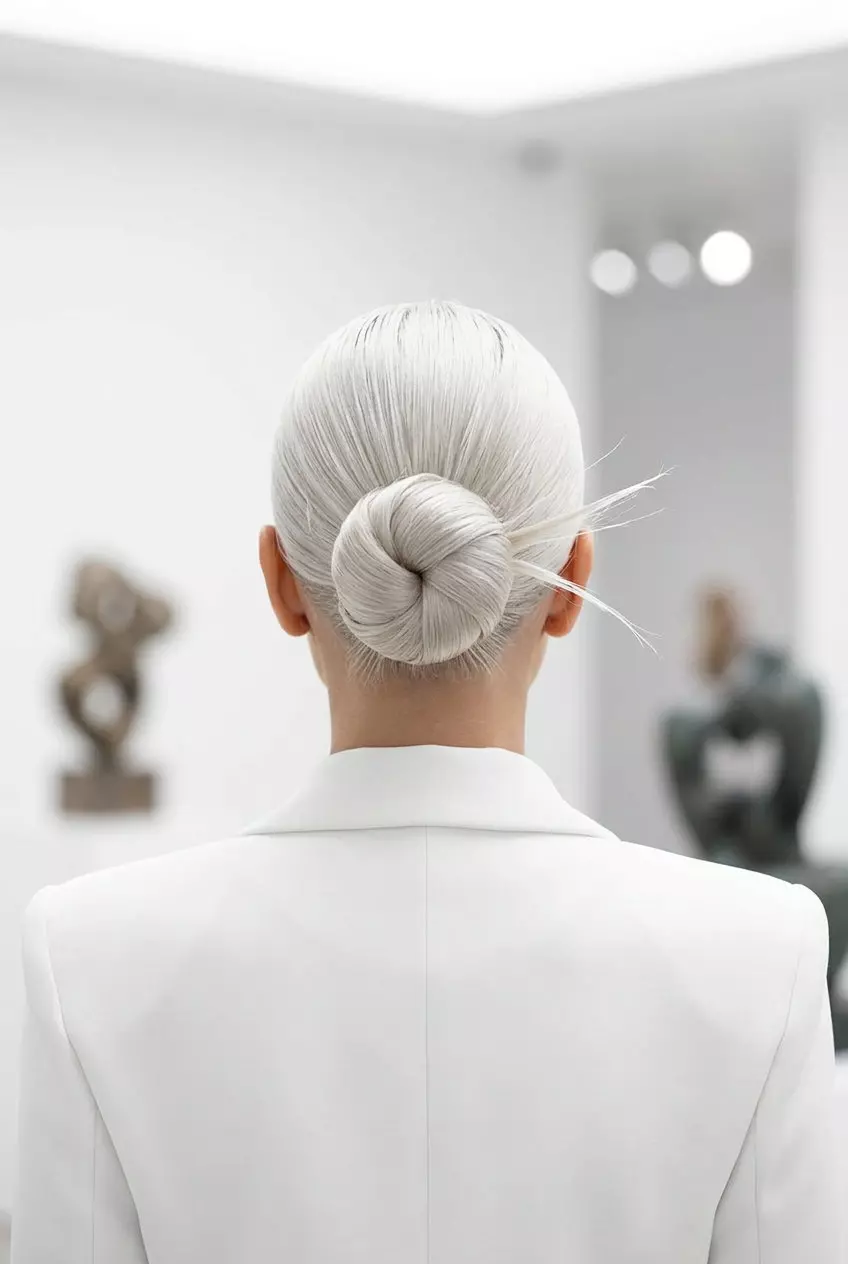
This isn’t a bun you’re doing solo on a Tuesday night. Sculpted bun styles like this one live in the land of salon appointments and professional finishing—the kind where a stylist uses a flat iron to seal each edge into submission. Platinum blonde at this level of precision demands flawless execution, meaning fine to medium straight hair shows the geometry best; thicker textures will blur those sharp lines no matter how hard you try. The payoff is a bun so architectural it looks almost digital, which plays well in high-concept settings where the hair itself becomes the statement rather than softening your face.
The Apricot Bohemian Crown Braid Bun
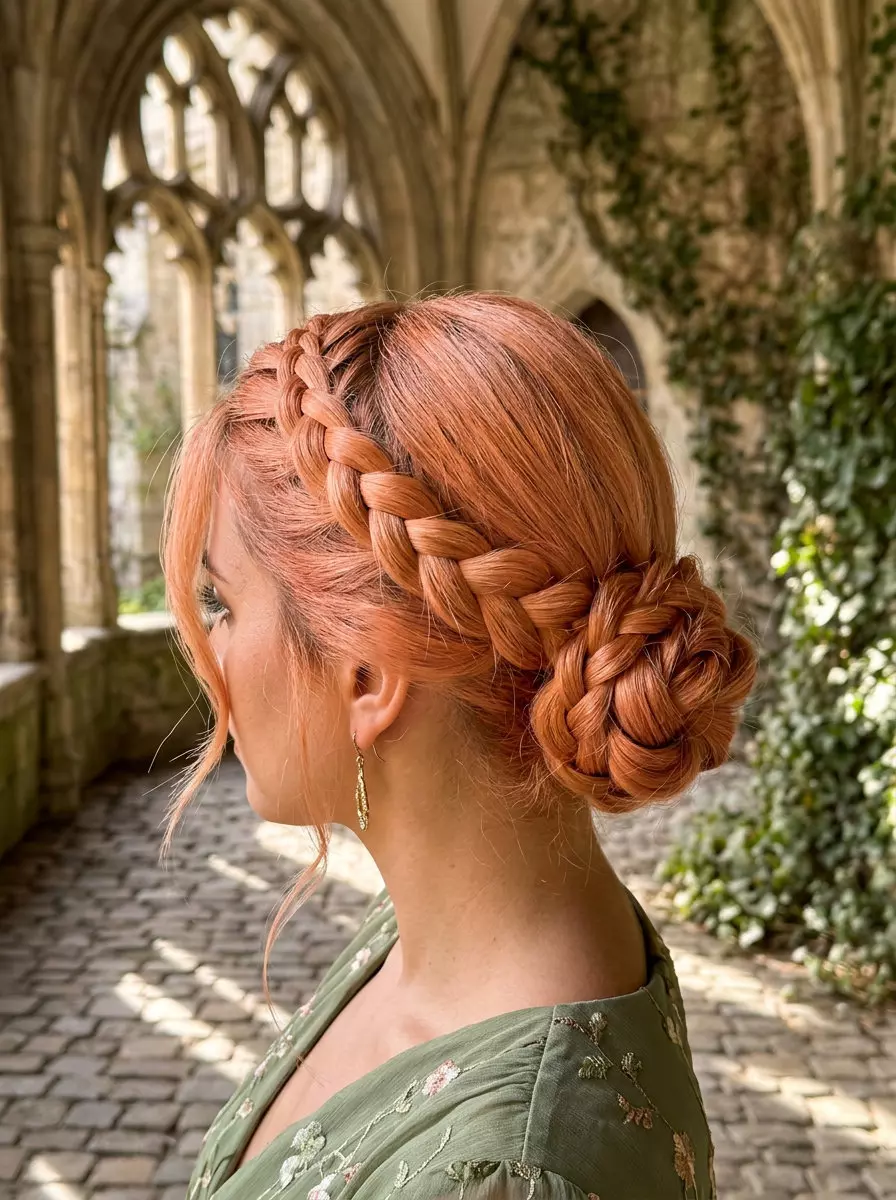
A braided crown bun tutorial long hair works best when you’ve got at least shoulder-length strands and are willing to spend 20 minutes on the first attempt. This pulls from Vanessa Hudgens’ Coachella moves—two Dutch braids wrapped around the head, meeting at the nape where they coil into a soft, textured bun. Wavy or thick hair holds the braid pattern better than fine strands, and the apricot crush tone (a warm, muted peachy-blonde balayage) reads richer when light catches the dimension. The whole thing falls apart if you expect it to hold 12 hours; realistically you’re looking at 6–8 before wisps escape around your face, which is sort of the point.
The Espresso Glass High Bun
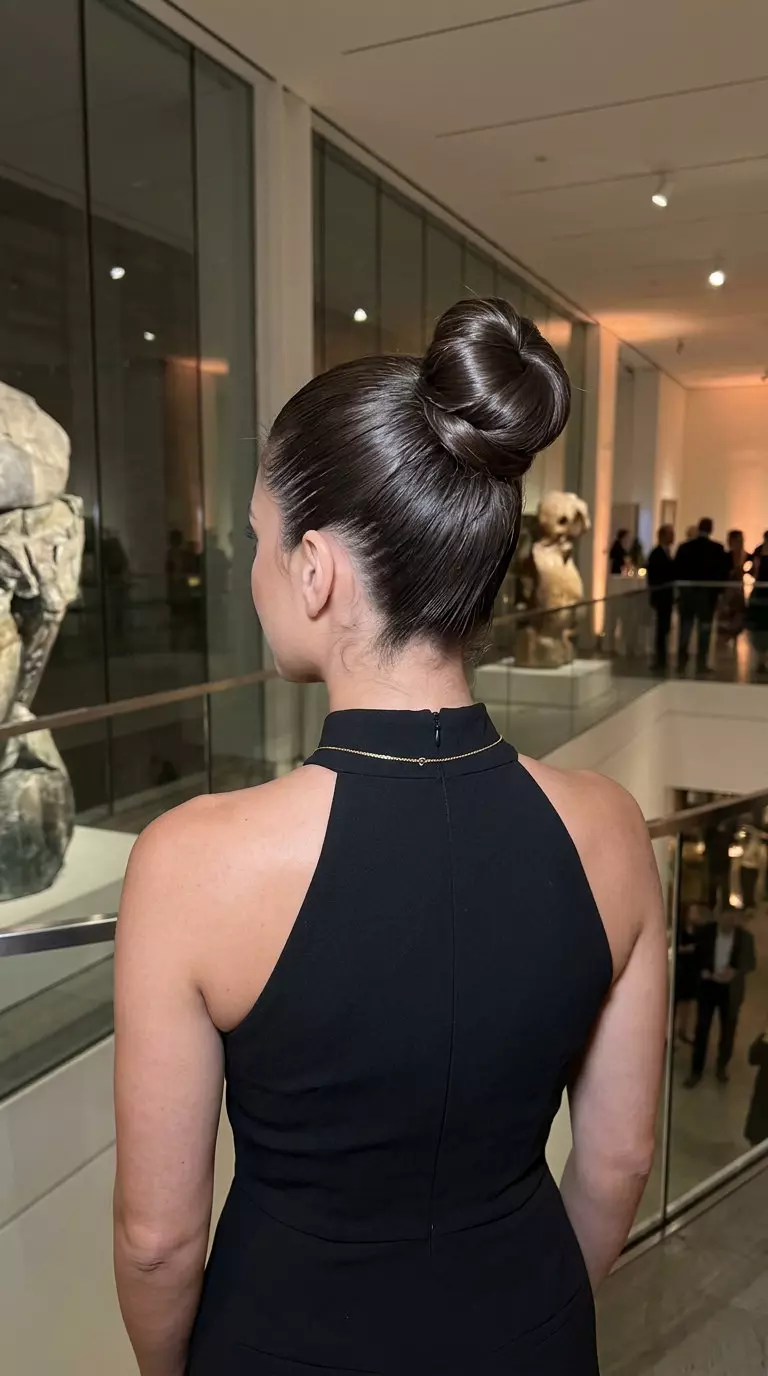
Start with a clean part—center or side, your call—and pull everything back into a high, tight ponytail at the crown. Twist the ponytail and wrap it into a bun, then use a clear smoothing gel on a fine-tooth comb to slick any baby hairs down and seal the edges. This style demands straight to wavy hair with enough density to hold the twist grip, and the espresso brunette with a gloss finish (what Sofia Richie’s been doing) amplifies the mirror-like shine you’re after. A sleek high bun tutorial lives or dies on the quality of your gloss application and how aggressively you smooth the surface—if you’re not seeing your reflection in the bun, you’re not done yet.
The Buttercream Voluminous Cloud Bun
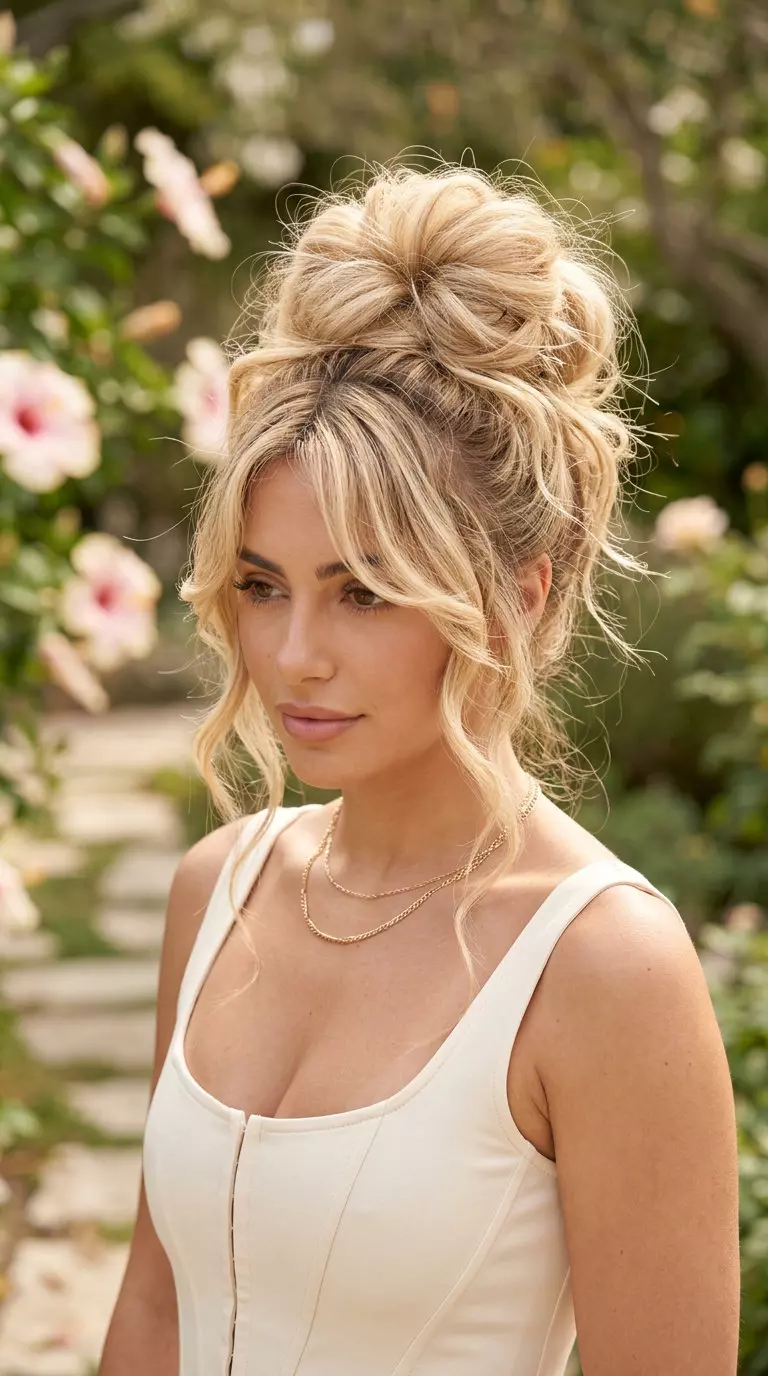
Zendaya’s take on the voluminous cloud bun tutorial starts with day-old waves or a soft curled base—don’t blow-dry smooth. Gather everything at the crown, but don’t twist tight; instead, let the ponytail sit loose and floppy, then gently tease and twist it into a bun that reads as almost cloud-like rather than a defined knot. Buttercream blonde (that soft, creamy balayage) disguises the messiness and makes the whole thing feel intentional rather than I-didn’t-try. Fine to medium wavy hair actually works better here than thick strands because the softness won’t weigh itself down, and you’ll get that airy, slightly undone texture Zendaya pulled off at the Challengers premiere.
The Power Clipper-Fade High Bun
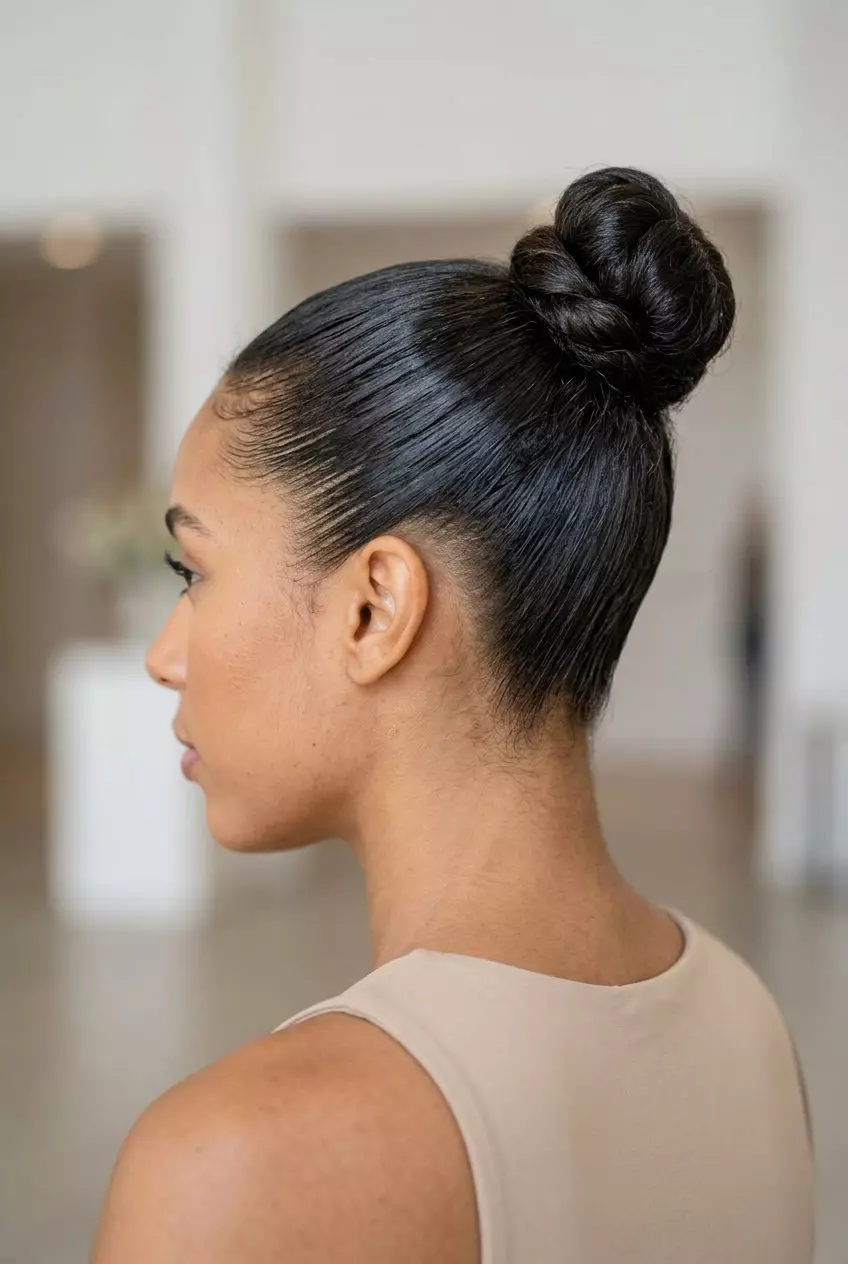
This is the corporate-tower version of the high bun, and it requires density at the sides and back to read as sharp. Pull everything up into a high ponytail, twist, wrap, and secure—then here’s the wry part—the magic is what you didn’t put in the bun. A tight clipper fade at the nape (undercut short, blended into medium length above) creates that architectural severity, which is why medium to thick straight or slightly wavy hair is non-negotiable; fine hair can’t support the fade without looking thin. The slicked back high bun tutorial version pairs this fade with a gel-sealed surface and a sharp part, held for about 6 hours before it starts to relax, and honestly that’s plenty of time for a conference or high-stakes dinner where you need to look like you’ve got your life assembled.
The Midnight Cherry Spiky Top Knot
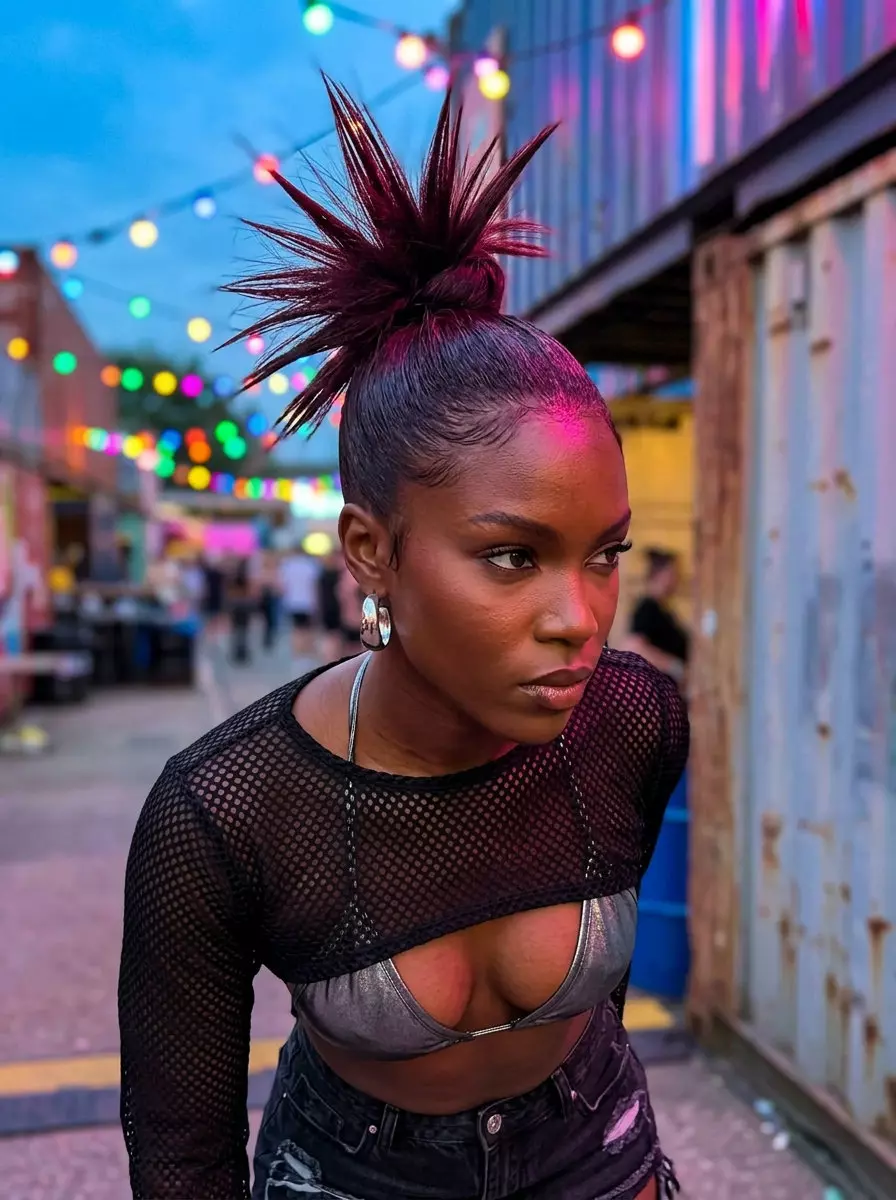
This is a high-commitment look. You’ll need straight to wavy hair, fine to medium density, and willingness to style it daily—the razored ends demand crisp definition or they flatten. Expect 15 minutes your first attempt, closer to 8 once muscle memory sets in. Start with damp hair, blow-dry with tension at the roots, then section the crown into 4–5 triangles and backcomb each one hard before twisting into the base knot. The spiky bun tutorial works best on day-one or day-two hair; fresh-from-shampoo strands slip too much. Skip this if you have naturally curly or coily hair—the texture fights the sleekness you’re after, and the spikes read as frizz instead of intentional.
The Honey Twisted Crown Bun
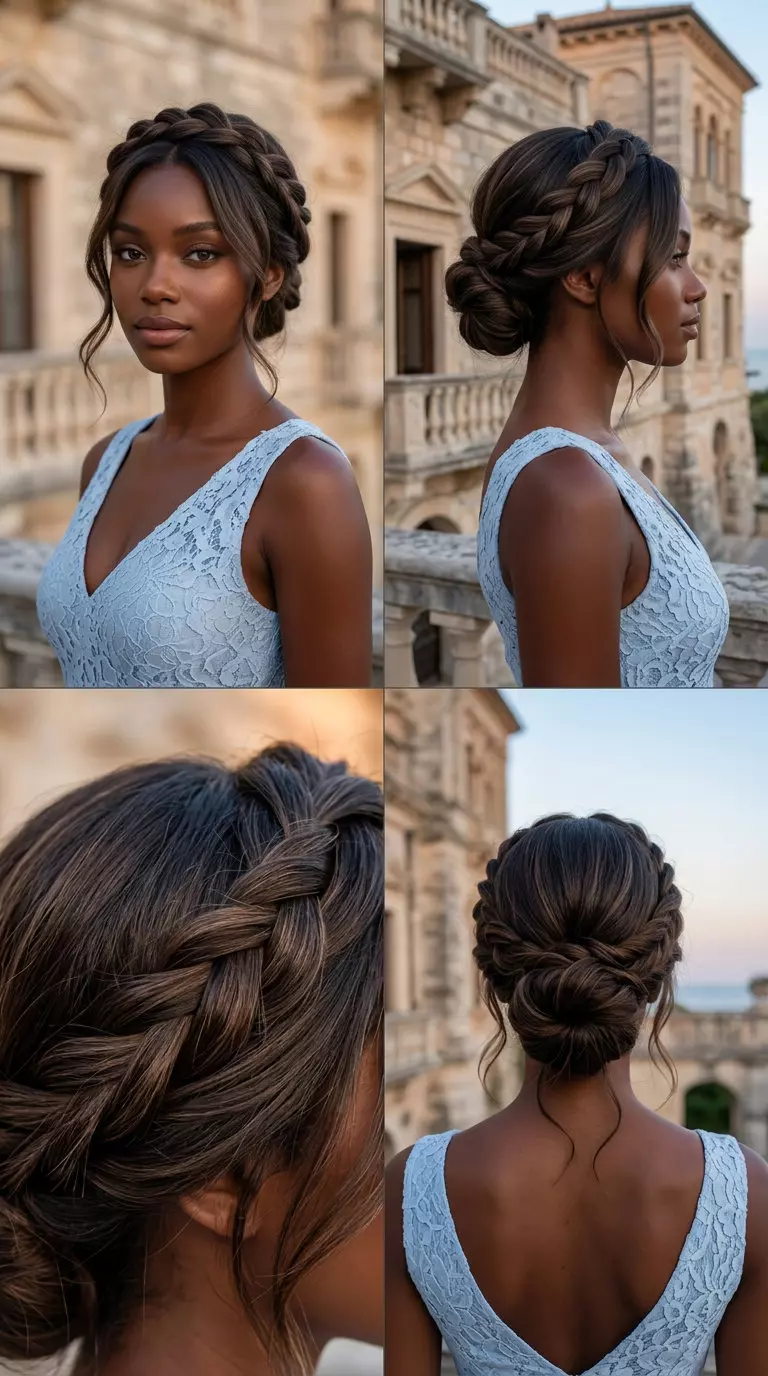
This twisted crown bun tutorial long hair takes patience—we’re talking 20 minutes minimum on first tries. You need medium to long lengths, straight to wavy texture, and hair that holds a twist without slipping (day-two texture helps enormously here). Start by creating a deep side part, then take a 2-inch section from behind one ear and twist it loosely around the crown toward the opposite ear, pinning as you go. When you reach the other side, gather all hair into a low ponytail, twist that section too, and coil it into a bun at the nape. The result reads Grace Kelly-level romantic when done right, but the difficulty is real—the crown twist has to grip or the whole structure caves. This is not a style for fine hair or fresh-washed strands.
The Apricot Punk High Bun
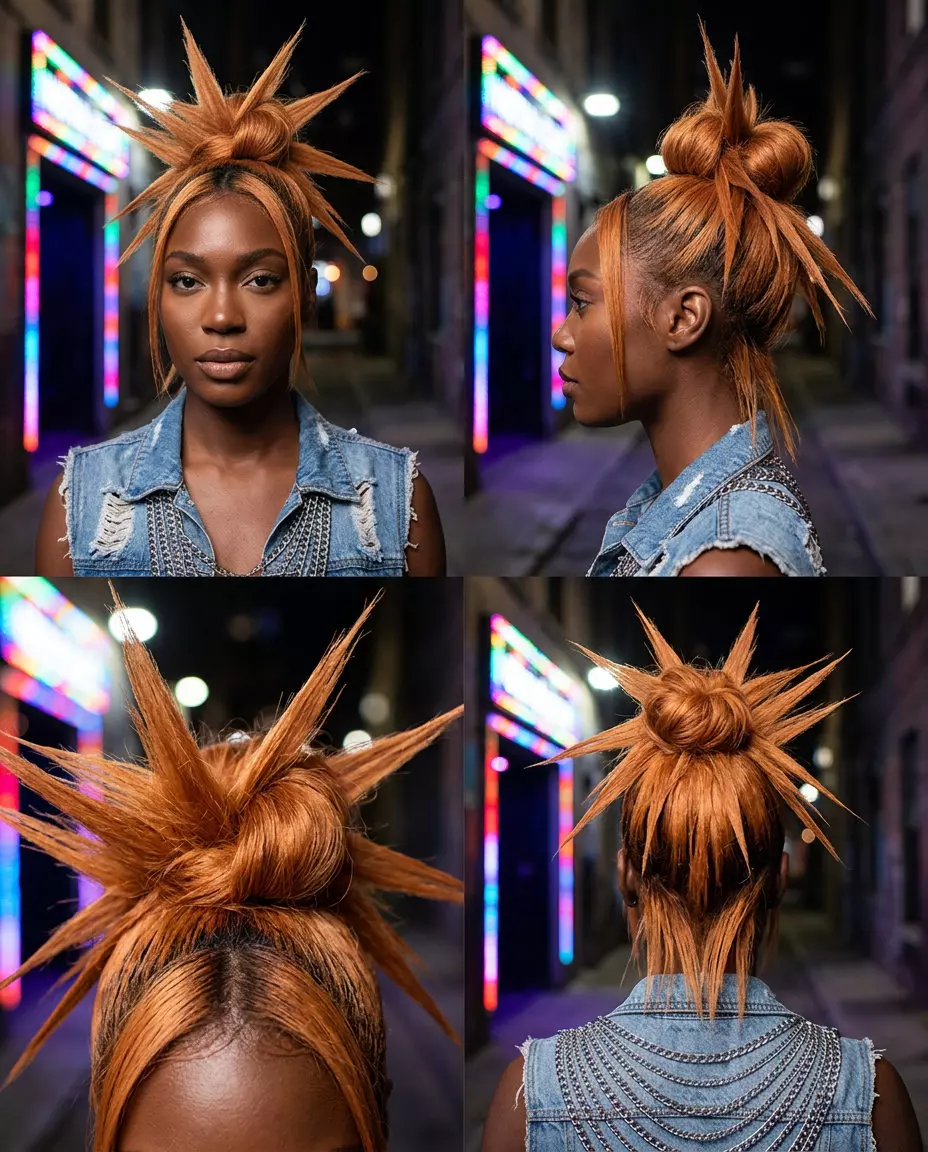
Shoulder-length minimum. Shorter than that and you won’t have enough volume to create the spiky texture this look demands. Blow-dry hair completely straight, then use a texturizing spray or dry shampoo at the roots and throughout the mid-lengths to create grip. Gather hair into a high ponytail, tease the base hard, then pull sections of the ponytail outward and secure them around the base with bobby pins, fanning them into spikes as you go. The color matters here—apricot or warm blonde reads punk; brown or natural shades read messy. This is high-maintenance: color refresh every 4–5 weeks, trims every 8–10 weeks to keep the spikes sharp. For punk bun short hair, you’re competing against flatness and slip, so texture is non-negotiable.
The Buttercream Voluminous Cloud Bun
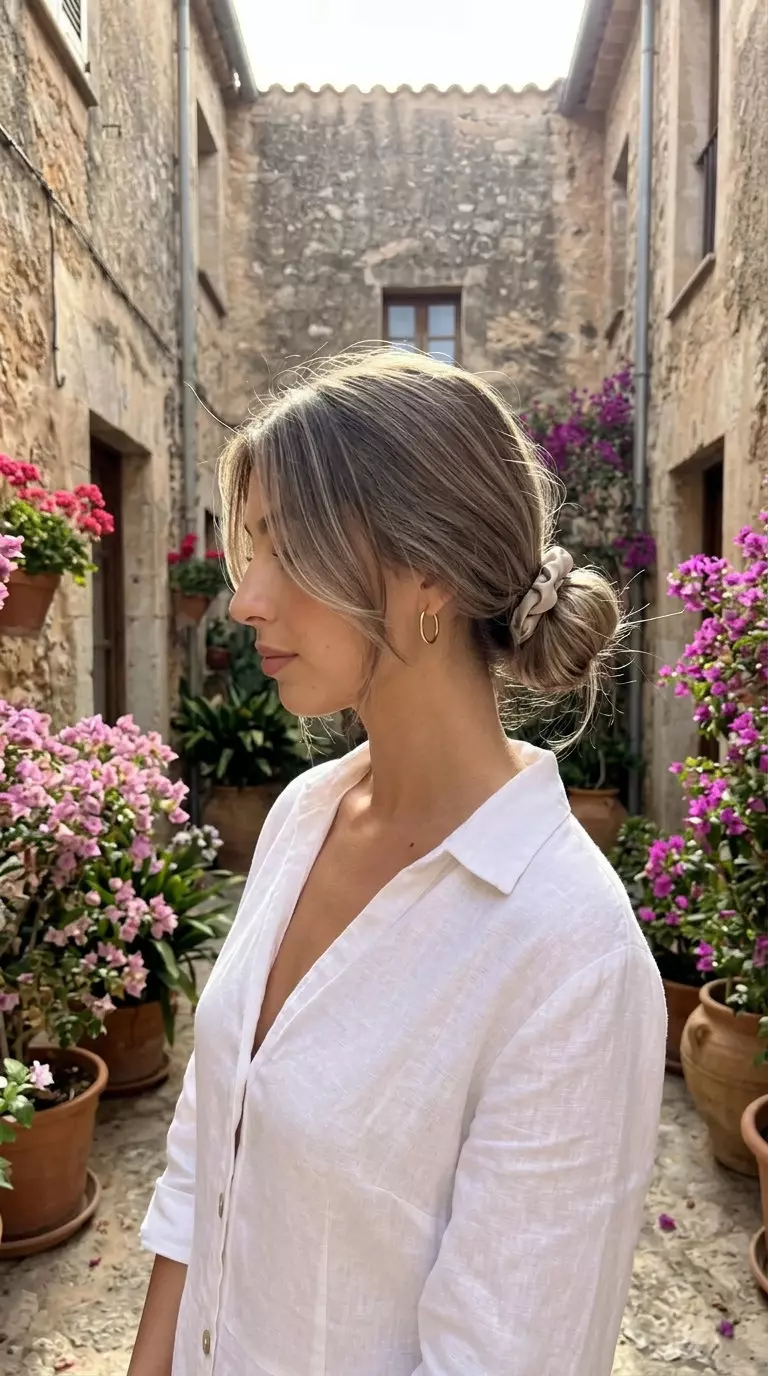
This is the low-effort option. Messy low bun long hair thrives on second-day texture, minimal styling time, and a vibe that rewards imprecision. Start with wavy or textured hair, gather it into a low ponytail at the nape, then twist loosely and coil without tightening—let pieces fall out naturally around the face. Secure with 3–4 bobby pins and leave some tendrils loose. Done in 5 minutes and it actually looks better if a few sections are slightly messy. Works on fine to medium hair, round to heart-shaped faces, and requires almost no maintenance beyond a trim every 10–12 weeks. The mushroom bronde balayage color trend pairs well here—those soft, blended tones make the bun read intentional even when it’s genuinely undone.
The Classic Braided Wedding Bun
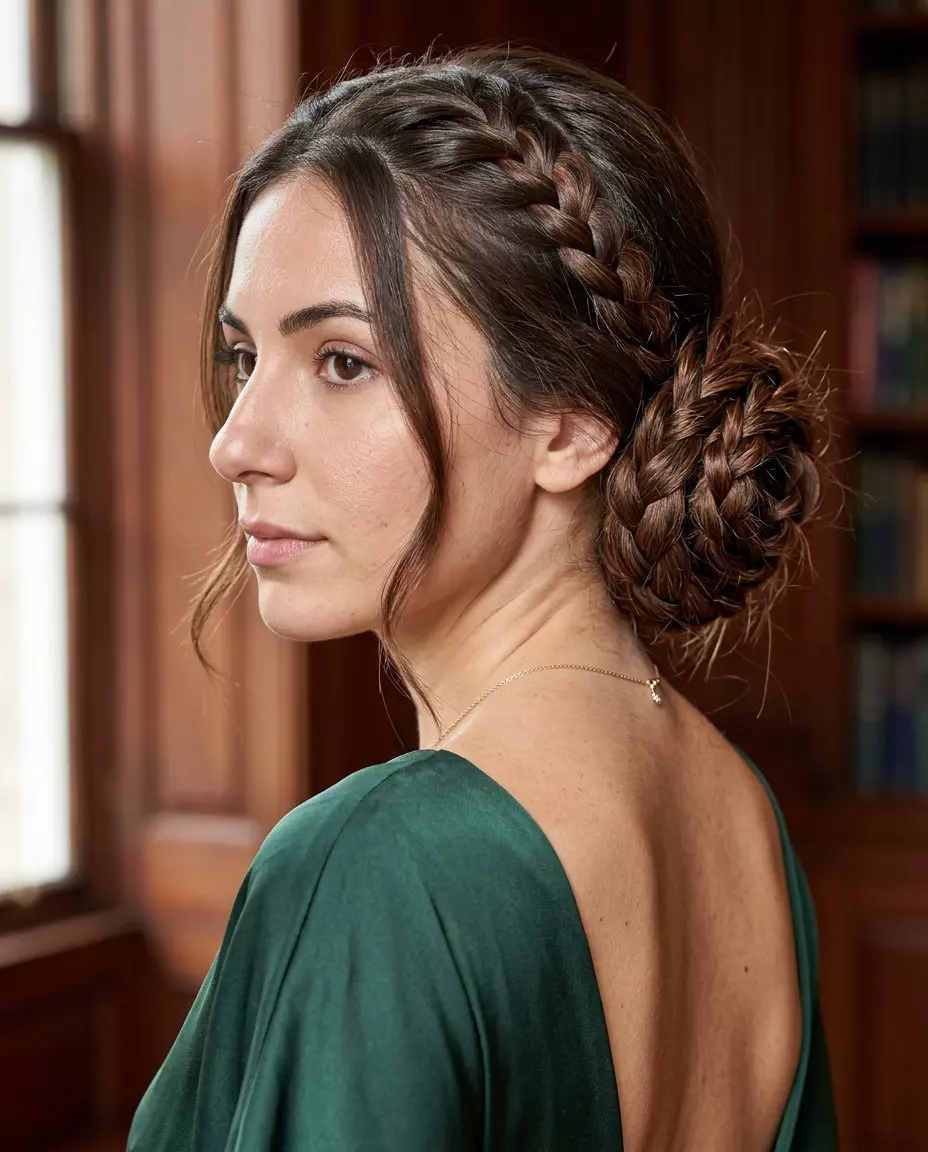
Advanced skill required. This braided wedding bun works on straight, wavy, or loosely curly hair with medium to thick density—hair that holds a braid without slipping or frizzing. Section the crown, create two Dutch braids that spiral inward, then gather the loose ends into a low bun and pin the braids around it to form a rosette pattern. Takes 30 minutes even with practice. The payoff is undeniable: intricate detail that reads polished without looking overdone, flattering on all face shapes, and stable enough for an 8-hour event. Maintenance is light—trim every 10–12 weeks to keep the underlying cut fresh, gloss every 8–10 weeks for dimension. If your hair won’t hold a braid (very fine, very straight, very slippery), this isn’t the move; you’ll spend half the time fighting slip and the braids will lose definition by hour two.
Still Deciding? Here’s a Quick Comparison
| Hairstyle | Difficulty | Maintenance | Best Face Shapes | Pros | Cons | |
|---|---|---|---|---|---|---|
| Edgy & Textured | ||||||
| 9. The ’90s Sleek Space Buns | Moderate | Medium — every 4-6 weeks | oval, diamond, square | Suits most face shapesWorks on multiple texturesLayers add movement | Not ideal for very curly hair |
| 15. The Sculpted Architectural Bun (Color Melt) | Moderate | High — every 6-8 weeks | oval, diamond, heart | Suits most face shapesWorks on multiple texturesLayers add movement | Frequent salon visits needed |
| 16. The Platinum Blonde Sculpted Bun | Salon-only | High — every 4-6 weeks | oval, square, diamond | Suits most face shapesWorks on multiple texturesLayers add movement | Requires professional styling |
| 21. The Slicked-Back High Bun | Moderate | Medium — every 3-4 weeks | oval, long, diamond | Suits most face shapesWorks on multiple texturesLayers add movement | Not ideal for very curly hair |
| 22. Spiky Y2K Top Knot | Moderate | High — every 4-6 weeks | oval, square, diamond | Suits most face shapesWorks on multiple texturesLayers add movement | Frequent salon visits needed |
| 24. The Punk Spiked Bun | Moderate | High — every 4-5 weeks | square, diamond, oval | Suits most face shapesWorks on multiple texturesLayers add movement | Frequent salon visits needed |
| Classic & Clean | ||||||
| 1. The Midnight Cherry Messy Bun | Easy | High — every 4-6 weeks | all face shapes | Easy to style at homeWorks on multiple texturesLayers add movement | Frequent salon visits needed |
| 3. The Mushroom Bronde French Twist Bun | Moderate | Medium — every 12-16 weeks | oval, long, square | Suits most face shapesWorks on multiple texturesFlattering face-framing | Not ideal for very curly hair |
| 5. The Double Dutch Braid Buns | Moderate | Medium — every 12-16 weeks | all face shapes | Works on multiple texturesLayers add movement | Not ideal for very curly hair |
| 6. The Soft Wavy Chignon | Moderate | Medium — every 8-10 weeks | round, oval, square | Suits most face shapesWorks on multiple texturesLayers add movement | Not ideal for very curly hair |
| 7. The Classic Ballerina Bun | Moderate | Medium — every 12-16 weeks | All face shapes | Suits most face shapesWorks on multiple texturesFlattering face-framing | Not ideal for very curly hair |
| 8. The Beachy Top Knot | Easy | Low — every 10-12 weeks | round, oval, square | Low maintenanceEasy to style at homeSuits most face shapes | Not ideal for fine hair |
| 10. The Mini Bun Duo | Easy | Medium — every 8-10 weeks | long, oval, square | Easy to style at homeSuits most face shapesWorks on multiple textures | Not ideal for very curly hair |
| 14. The Apricot Crush Bun with Tendrils | Moderate | High — every 4-5 weeks | oval, round, heart | Suits most face shapesWorks on multiple texturesLayers add movement | Frequent salon visits needed |
| 18. The Braided Crown Bun | Moderate | High — every 4-6 weeks | all face shapes | Works on multiple texturesLayers add movementFlattering face-framing | Frequent salon visits needed |
| 19. High-Shine Architectural Bun | Moderate | Medium — every 10-12 weeks | All face shapes | Suits most face shapesWorks on multiple texturesFlattering face-framing | Not ideal for very curly hair |
| 23. The Twisted Crown Bun | Moderate | High — every 10-12 weeks | oval, heart, long | Suits most face shapesWorks on multiple texturesLayers add movement | Frequent salon visits needed |
| 26. Braided Rosette Low Bun | Moderate | Medium — every 10-12 weeks | all face shapes | Works on multiple texturesLayers add movementFlattering face-framing | Not ideal for fine hair |
| Soft & Romantic | ||||||
| 2. The Honey Highlighted Twisted Bun | Moderate | Medium — every 8-10 weeks | round, oval, heart | Suits most face shapesWorks on multiple texturesLayers add movement | Not ideal for very curly hair |
| 11. Soft Sculpted Messy Bun | Easy | Low — every 8-10 weeks | All face shapes | Low maintenanceEasy to style at homeSuits most face shapes | Not ideal for very curly hair |
| 13. The Textured Half-Up Bun | Easy | Medium — every 8-10 weeks | round, oval, heart | Easy to style at homeSuits most face shapesWorks on multiple textures | Not ideal for very curly hair |
| 20. Buttercream Blonde Cloud Bun | Moderate | Medium — every 12-16 weeks | All face shapes | Suits most face shapesWorks on multiple texturesLayers add movement | Not ideal for very curly hair |
| 25. The Textured Low Bun | Easy | Low — every 10-12 weeks | round, oval, heart | Low maintenanceEasy to style at homeSuits most face shapes | Not ideal for very curly hair |
Frequently Asked Questions
Which summer bun is easiest for beginners and what’s the quickest to do?
The Midnight Cherry Messy Bun (⭐, 10 min) and the Buttercream Blonde Top Knot (⭐, 15–20 min) are both beginner-friendly. The Midnight Cherry focuses on controlled messiness with second-day hair and dry shampoo for grip; the Buttercream Blonde relies on high volume and a blunt cut to do the heavy lifting.
How do I make my bun stay put all day in summer humidity?
For ultimate hold, the Mushroom Bronde French Twist Bun uses smoothing cream and strong-hold balm for a glass-like finish that resists frizz and slip. The Double Dutch Braid Buns , being intricately braided, are also extremely secure and humidity-resistant—they’ll hold for 8 hours without loosening.
Can I achieve these bun styles on medium-length hair?
Absolutely. The Honey Highlighted Twisted Bun and the Buttercream Blonde Top Knot are perfect for medium-length hair, relying on layering or blunt cuts to maximize bun volume and texture. The Mushroom Bronde French Twist Bun also works well on collarbone-length hair if your underlying cut is sharp.
What’s the trick to a ‘messy’ bun looking chic instead of sloppy?
For the Midnight Cherry Messy Bun , style on second-day hair with dry texturizing spray for grip, secure the bun low with a silk scrunchie, then pull out specific face-framing pieces *after* the bun is locked in place. This creates a deliberate undone effect rather than an accidental disaster—the difference is intentionality and placement.
Final Thoughts
So there you have it: five summer bun hairstyles 2026 ready to tackle humidity, dance floors, or just a Tuesday—proving that effortlessness is truly the ultimate summer flex. The Midnight Cherry Messy Bun takes 10 minutes; the Double Dutch Braid Buns take 25 and hold for 8 hours. Pick your flex and stop overthinking it.